
Headlights/Position Lights
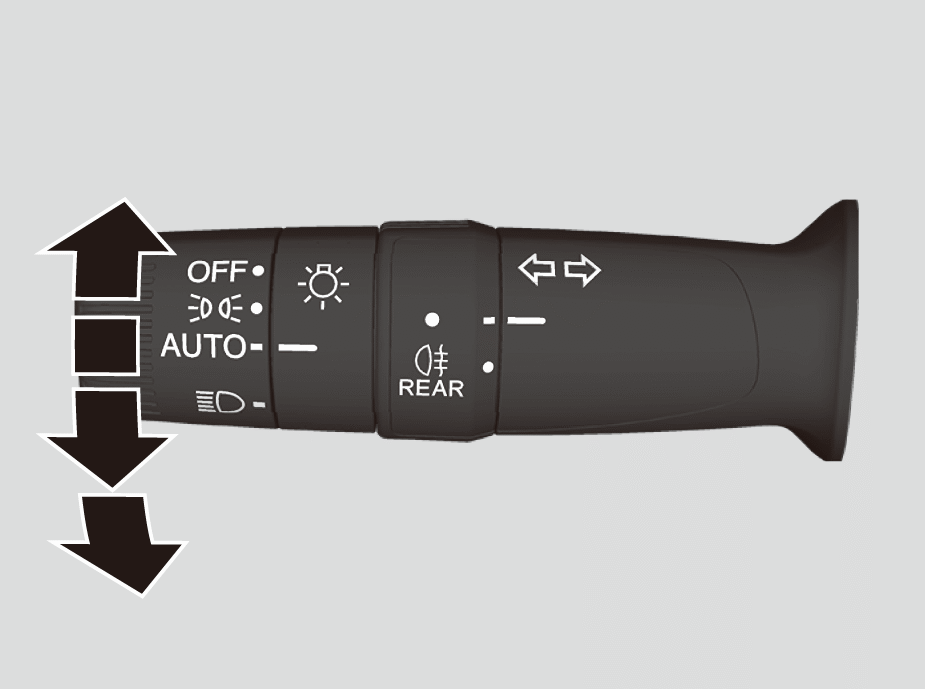
The lights will turn on automatically depending on the ambient brightness.
They can also be switched on and off manually.
- The
 lights on indicator in the instrument panel will turn on.
The exterior lights will switch on automatically when the light switch is set to AUTO while the power mode is in ON.
Manual Operation
Headlights/position lights:
Turn the light switch to .
.
Position lights:
Turn the light switch tountil the position lights come on, then release.
Headlight/position lights off:
While the shift position is in P and the parking brake is applied, turn the light switch to OFF and then release once the lights turn off.
- The lights will come back on automatically when:
- The light switch is turned to OFF again and released.
- The shift position is changed out of P and the parking brake is released.
When the position lights are on, the tail and rear licence plate lights will also switch on.
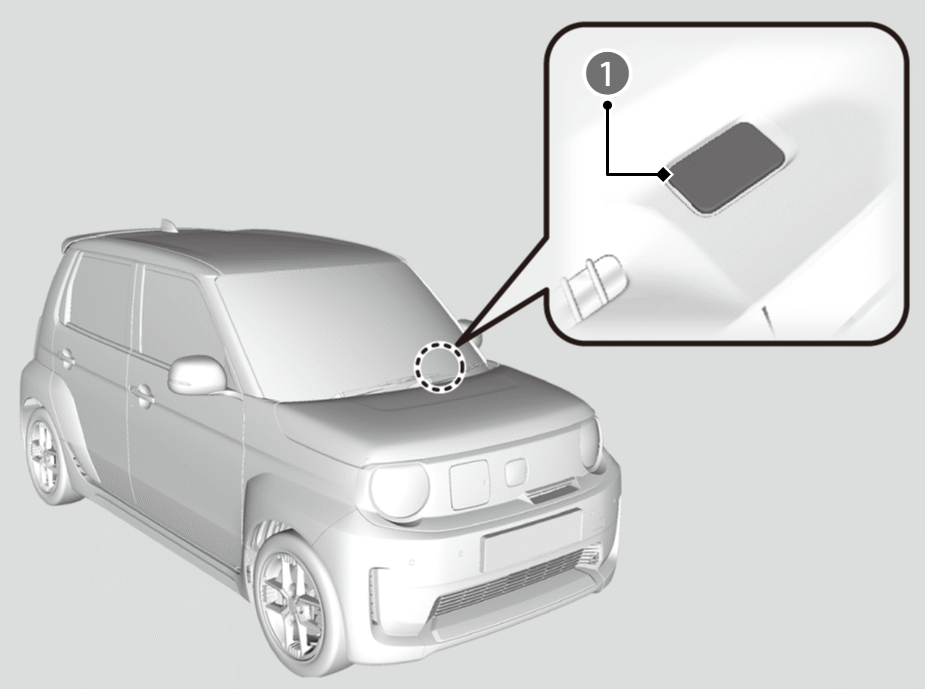

Light Sensor
The light sensor is positioned as indicated in the diagram.
Do not cover the light sensor.

 or
or and the power is turned to OFF, a beeper sounds when the driver’s door is opened.
High Beams
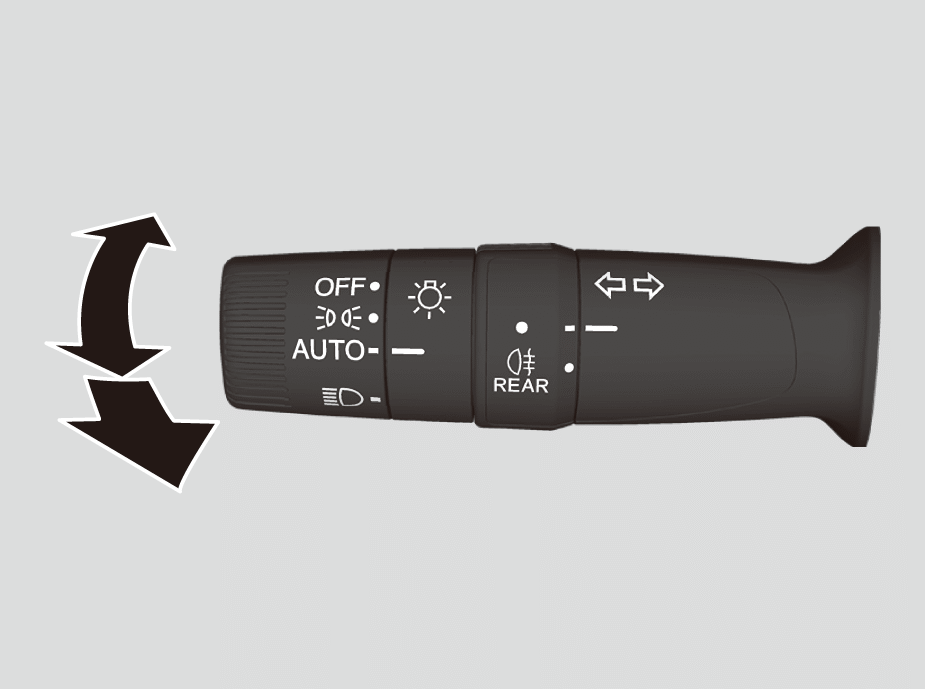
When the headlights are on, push the lever forward.
Pull the lever back to return to low beams.
The high beam indicator in the instrument panel will turn on when the high beams are on.
- Flashing the high beams: Pull the lever back, and release it.
Headlight Integration with Wipers
The headlights automatically come on when the wipers are used several times within a certain number of intervals with the headlight switch in AUTO.
The headlights automatically go off a few minutes later if the wipers are stopped.
This feature activates while the headlights are off in AUTO.
The instrument panel brightness does not change when the headlights come on.
At dark ambient light levels, the automatic lighting control feature turns on the headlights, regardless of the number of wiper sweeps.
Automatic Lighting Off Feature
The headlights, all other exterior lights, and the instrument panel lights turn off 15 seconds after you set the power mode to VEHICLE OFF, take the keyless remote with you, and close the driver’s door.
However, when the switch is in , the position lights remain on.
If you set the power mode to VEHICLE OFF with the headlight switch on, but do not open the door, the lights turn off after 10 minutes (3 minutes, if the switch is in the AUTO position).
The lights turn on again when you unlock or open the driver’s door.
If you unlock the door, but do not open it within 15 seconds, the lights go off.
If you open the driver’s door, you will hear a reminder chime alerting you that the lights are on.

You can change the headlight auto off timer setting.
Rear Fog Lights
Can be used when the headlights are on.
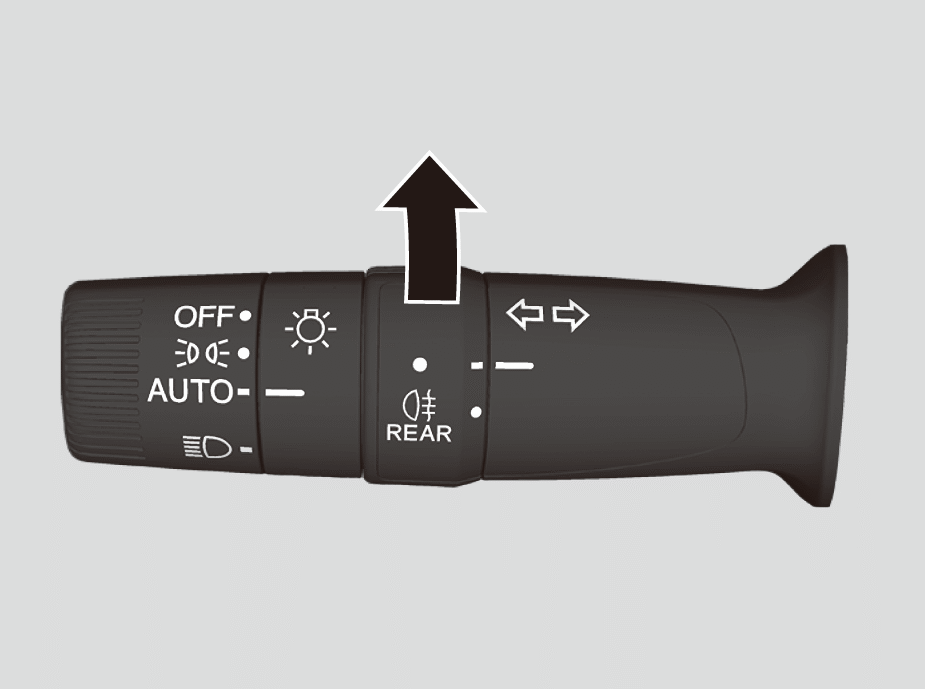
To turn the rear fog light on
Rotate the switch to .
.
Theindicator comes on.
Daytime Running Lights
The position/daytime running lights comes on when the following conditions have been met:
- The power mode is in ON.
- The headlight switch is in AUTO or
 .
. - The ambient light is bright.
To turn off the daytime running lights, turn the light switch to OFF while the vehicle is stopped, and then release once the lights turn off. When the transmission is changed out of P and the parking brake is released, the lights will come on again. Otherwise, if the light switch is once more turned to OFF, the lights will come on again.
The tail lights will also come on when the daytime running lights are on.
Headlight Adjuster
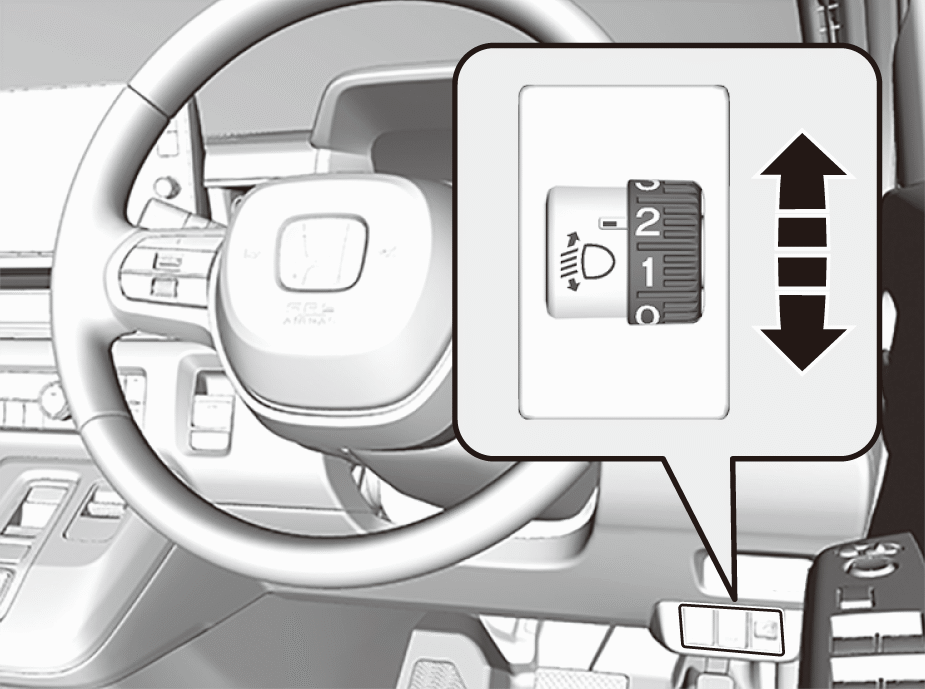
You can adjust the vertical angle of the low beam headlights When the position lights or headlights are on.
Turn the adjustment dial to select an appropriate angle for the headlights. The larger dial number indicates the lower angle.
- If you suspect that the headlights are not positioned properly, have the vehicle inspected by a dealer.
To select the adjusting dial position
Refer below for the appropriate dial position for your vehicle’s riding and loading conditions.
0: A driver/A driver and a front passenger
1: Four persons in the front and rear seats
2: Four persons in the front and rear seats and luggage in the luggage area, within the limit of maximum permissible axle weight and maximum permissible vehicle weight
3: A driver and luggage in the luggage area, within the limits of maximum permissible axle weight and maximum permissible vehicle weight
Auto High-Beam
The front wide view camera detects the light sources ahead of the vehicle such as the lights of a preceding or oncoming vehicle, or street lights. When you are driving at night, the system automatically switches the headlights between low beam and high beam depending on the situation.
How to use the auto high-beam
Activating the system
When all of the following conditions have been met, the auto high-beam indicator comes on and automatically switches between the high beam and low beam, depending on the situation.
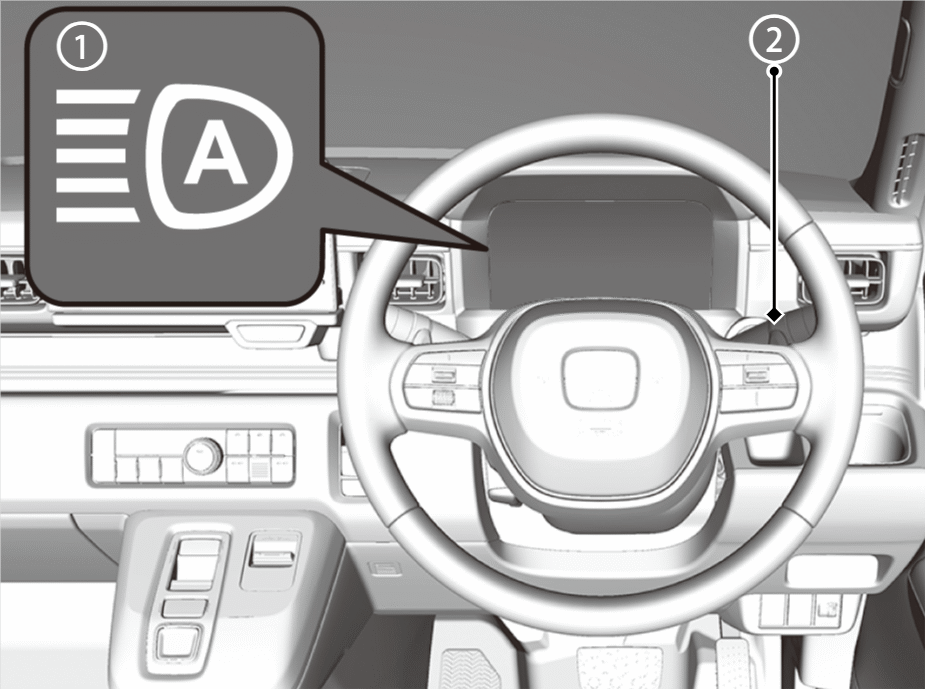
Auto High-Beam Indicator

Light Switch
- The power mode is in ON.
- The light switch is in AUTO.
- The lever is in the low beam position.
- The headlights have been automatically activated.
- It is dark outside the vehicle.
If the auto high-beam indicator does not come on even when all the conditions have been met, carry out either of the procedures below and the indicator will come on.
- Pull the lever towards you and release it.
- Turn the light switch to
 then turn the light switch to AUTO.
The auto high-beam system does not always operate in every situation. This system is just for assisting the driver. Always observe your surroundings and manually switch the headlights between high beam and low beam if necessary.
The range and the distance at which the camera can recognise light sources varies depending on conditions surrounding your vehicle.
Regarding the handling of the camera mounted to the inside of the windscreen, refer to the following.
For the auto high-beam to work properly:
- Do not place an object that reflects light on the dashboard.
- Keep the windscreen around the camera clean.
- When cleaning the windscreen, be careful not to apply the windscreen cleanser to the camera lens.
- Do not attach an object, sticker, or film to the area around the camera.
- Do not touch the camera lens.
If the camera receives a strong impact, or repairing of the area near the camera is required, consult a dealer.
How to turn off the Auto High-Beam System: You can turn the auto high-beam system on and off.
If the Some driver assist systems cannot operate: Camera temperature too high message appears:
- Use the climate control system to cool down the interior and, if necessary, also use defroster mode with the airflow directed toward the camera.
- Start driving the vehicle to lower the windshield temperature, which cools down the area around the camera.
If the Some driver assist system cannot operate: Clean front windscreen or poor viewing condition. message appears:
- Park your vehicle in a safe place, and make sure the windshield is clean. Clean the windshield if it is dirty. If the message does not disappear after the vehicle has been driven for a while, have your vehicle checked by a dealer.
In the following cases, the auto high-beam system may not switch the headlights properly or the switching timing may be changed. If the automatic switching operation does not fit your driving habits, please switch the headlights manually.
- The brightness of the lights from the preceding or oncoming vehicle is intense or poor.
- Visibility is poor due to the weather (rain, snow, fog, windscreen frost, etc.).
- Surrounding light sources like street lights, electric billboards, and traffic lights are illuminating the road ahead.
- The brightness level of the road ahead constantly changes.
- The road is bumpy or has many curves.
- A vehicle suddenly appears in front of you, or a vehicle in front of you is not in the preceding or oncoming direction.
- Your vehicle is tilted with a heavy load in the rear.
- A traffic sign, mirror, or other reflective object ahead is reflecting strong light towards the vehicle.
- The oncoming vehicle frequently disappears under roadside trees or behind median barriers.
- The preceding or oncoming vehicle is a motorcycle, bicycle, mobility scooter, or other small vehicle.
The auto high-beam system keeps the headlight low beam on when:
- Windscreen wipers are operating at a high speed.
- The camera has detected a dense fog.
Automatic switching between high-beam and low-beam
When the auto high-beam indicator comes on, the headlights switch between high beam and low beam based on the following conditions.
High beam
All of the following conditions must be met before the high beams turn on.
- Your vehicle speed is 40 km/h (25 mph) or more.
- There are no preceding or oncoming vehicles with headlights or taillights turned on.
- There are few street lights on the road ahead.
Low beam
One of the following conditions must be met before the low beams turn on.
- Your vehicle speed is 24 km/h (15 mph) or less.
- There is a preceding or oncoming vehicle with headlights or taillights turned on.
- There are many street lights on the road ahead.
Manual switching between high-beam and low-beam
If you want to manually switch the headlights between high beam and low beam, follow either of the procedures below. Note that when you do this, the auto high-beam indicator will turn off and the auto high-beam will be deactivated.
Using the lever:
Pull the lever towards you for flashing the high beams then release it.
- To reactivate the auto high-beam, follow either of the procedures below and the auto high-beam indicator will come on.
- Pull the lever towards you and release it.
- Turn the light switch to
 and then to AUTO when the lever is in the low beam position.
Using the light switch:
Turn the light switch to .
.
- To reactivate the auto high-beam, turn the light switch to AUTO when the lever is in the low beam position, and the auto high-beam indicator will come on.