
About Charging
There are two ways to charge the High Voltage battery: by using the AC charger or DC charger.
Suggested charging time
AC 230V charging (Incase of 16 amp): About 8 hours (full charge)
AC 230V charging (Incase of 30 amp*1): About 4 hours (full charge)
CCS2 DC charging (Incase of 50kW, 125 amp*1): About 30 minutes (80% charge)
*1: Maximum chargeable value
- The above charging times are estimates assuming that charging began as soon as the low battery charge notification appeared on the gauge, at an ambient temperature of 25°C.
- Charging time varies depending on conditions such as the remaining battery level, the ambient temperature, and the charger being used.
- You can check the estimated full charging time on the gauge.
- If the charge lid is frozen and cannot be opened, apply lukewarm water to it to melt the ice. Then, thoroughly wipe off all moisture before opening the charge lid.
- If the charging cable has dirt or water droplets on it, wipe them off with a clean, dry cloth. Do not wash the cable with water or clean it using any chemical products.
- When the 12-volt battery is disconnected, vehicle charging is not possible. After reconnecting the 12-volt battery, turn the power system on, then turn it off. Confirm that charging is possible.
- Charging is still possible while the power mode is set to ON. However, the power mode will not automatically turn to OFF once charging stops. Since this may cause the 12-volt battery to deplete, turn the power mode OFF as soon as possible.
- You can charge the High Voltage battery while the power system is on and equipment such as the air conditioning and audio systems are in use; however, the charging time may become longer, or charging may not be completed.
- If a blackout or other electrical interruption occurs during vehicle charging, the vehicle will automatically resume charging once power is restored.
- If the outside temperature is below -20ºC, the High Voltage battery may not start charging.
- While charging, sound may not be heard from the radio due to electromagnetic noise.
- Since the vehicle is charged with regenerative energy when you drive on a downward slope, regenerative braking may not be as effective when the vehicle is almost fully charged. When charging in a high place such as a mountain or hill, do not fully charge your vehicle.

- Charging equipment with this C mark identifier is compatible with AC charging.

- Charging equipment with this K mark identifier is compatible with DC charging.

- Do not hit the inlet and charging connector components with a hard object or drop them on the ground.
- Do not pull, twist, tangle, drag or step on the charging cable.
- Do not use or store near any sources of heat.
- Do not expose to liquids or use harsh chemicals to clean.
How to Charge (AC 230 V)
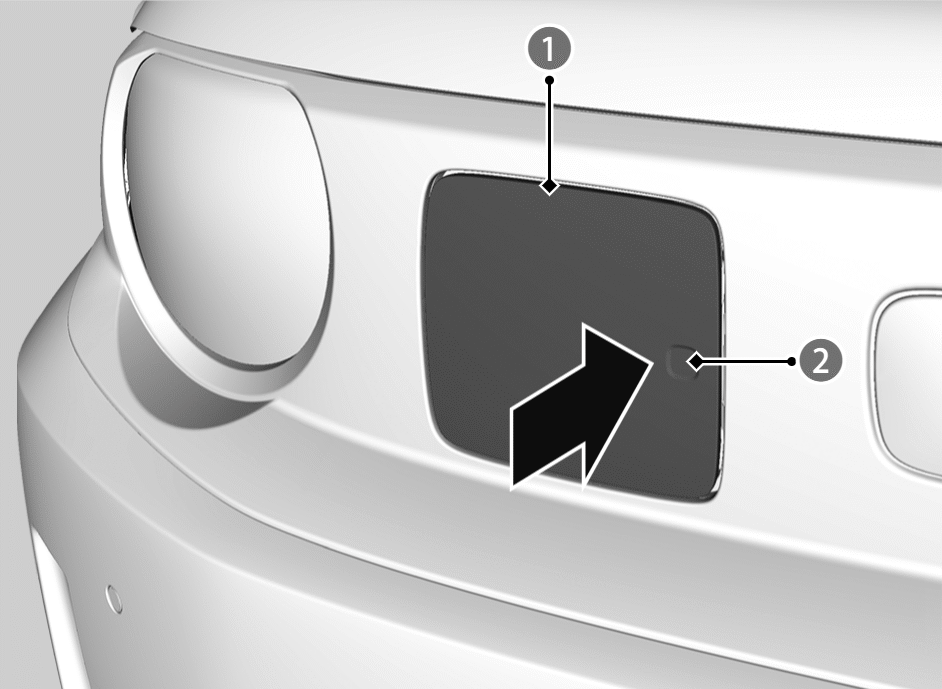
- Change the shift position to P and turn the power system off.
- Unlock the driver’s door.
- The charge lid (
 ) on the outer side of the vehicle will unlock.
 - If you carry a keyless remote, you can open the charge lid even if the doors are locked.
- The charge lid (
- Press and release the area indicated by the arrow (
 ) to release the charge lid. You will hear a click and the lid will open slightly.
 - Manually pull the charge lid to a fully open position.
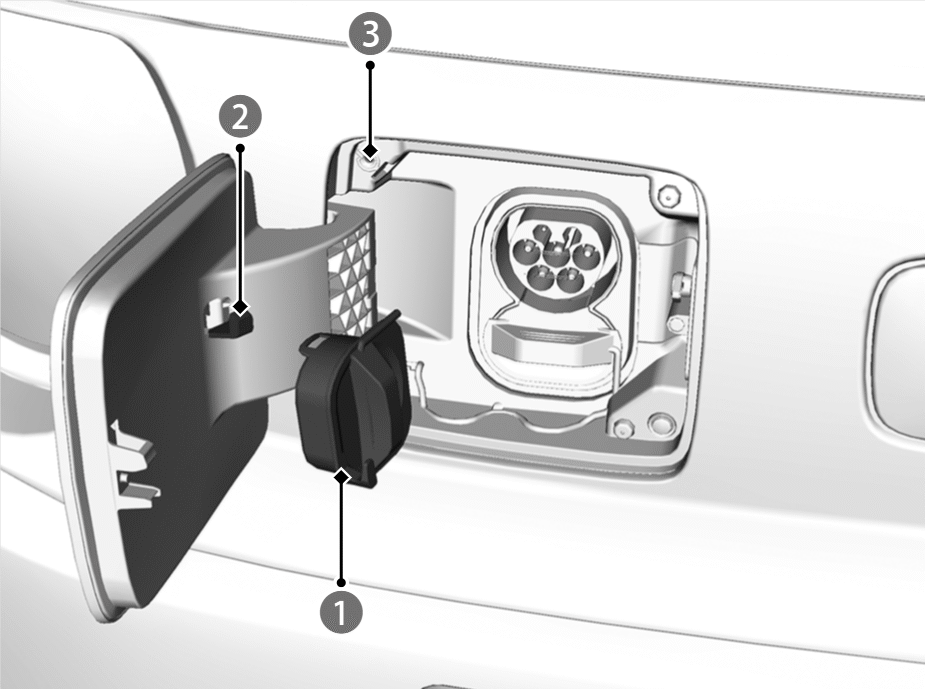
- Remove the upper cap ().
- Place upper cap on the hook ().
- Align and insert the charging connector into the vehicle’s inlet securely.
- The charge indicator (white) (
 ) stops blinking, and changes to slow blinking (blue) on when charging starts.
 - The charge indicator (blue) stops blinking once charging is completed. After about 15 seconds, the charge indicator goes off.
- The charge indicator (white) (
When charging is completed
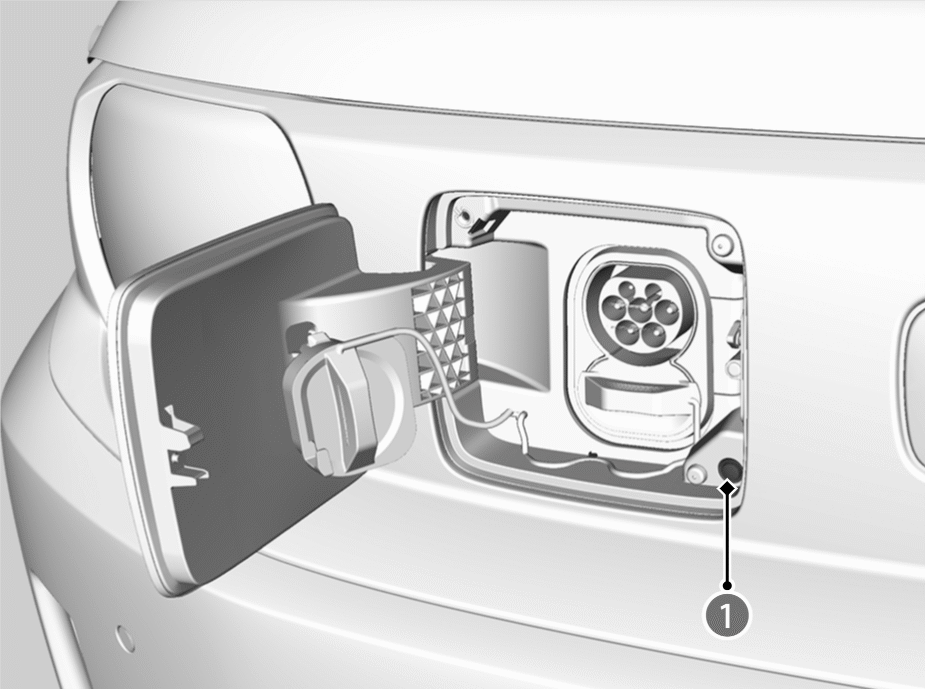
Press the unlock button (), and wait without touching the charging connector until you hear the actuation sound of the motor running. After confirming that the actuation sound of the motor has stopped, disengage the charging connector.
- Make sure to close the caps before you close the charge lid.
- Ask a dealer for more details on purchasing or using a recommended charging cable.
- The charger requires a properly grounded and dedicated circuit that is protected by an overcurrent protection device (circuit breaker). We also recommend that a GFCI (ground-fault circuit interrupter) protected outlet be used to charge the vehicle. Follow the GFCI maker’s installation instructions, or consult an electrician if you are not sure about installation requirements.
- Be sure to follow the instructions and safety precautions provided with the AC charging equipment.
- The charge speed slows down towards the completion of the battery charging.
- The charging connector can be disengaged when the doors are unlocked.
If the doors are locked, the charging connector cannot be disengaged unless you carry the keyless remote.
If you do not disengage it within 30 seconds of unlocking the doors, the charging connector will automatically relock. - If the charging connector does not disengage, do not disengage it forcefully, and follow the procedures mentioned in the following page.
What to do when you cannot start charging
If charging does not start, check the following potential causes and take appropriate action:
- The charging connector is not properly connected.
- Reinsert the connector until it hits the back so that it does not tilt.
- The vehicle is malfunctioning.
- Check the gauge.
- The 12-volt battery voltage is low.
- Charge or replace the 12-volt battery.
- The temperature of the High Voltage battery is low.
- Charging is restricted to protect the High Voltage battery. Move the vehicle to a warmer location (e.g., by towing). Charging will become possible once the High Voltage battery temperature rises.
- Scheduled charging wait time (charge timer) is set.
- Charging will become possible once you turn off the setting.
How to Charge (DC)
- Change the shift position to P and turn the power system off.
- Unlock the driver’s door.
- The charge lid () on the outer side of the vehicle will unlock.
- If you carry a keyless remote, you can open the charge lid even if the doors are locked.
- The charge lid (
- Press and release the area indicated by the arrow () to release the charge lid. You will hear a click and the lid will open slightly.
- Manually pull the charge lid to a fully open position.
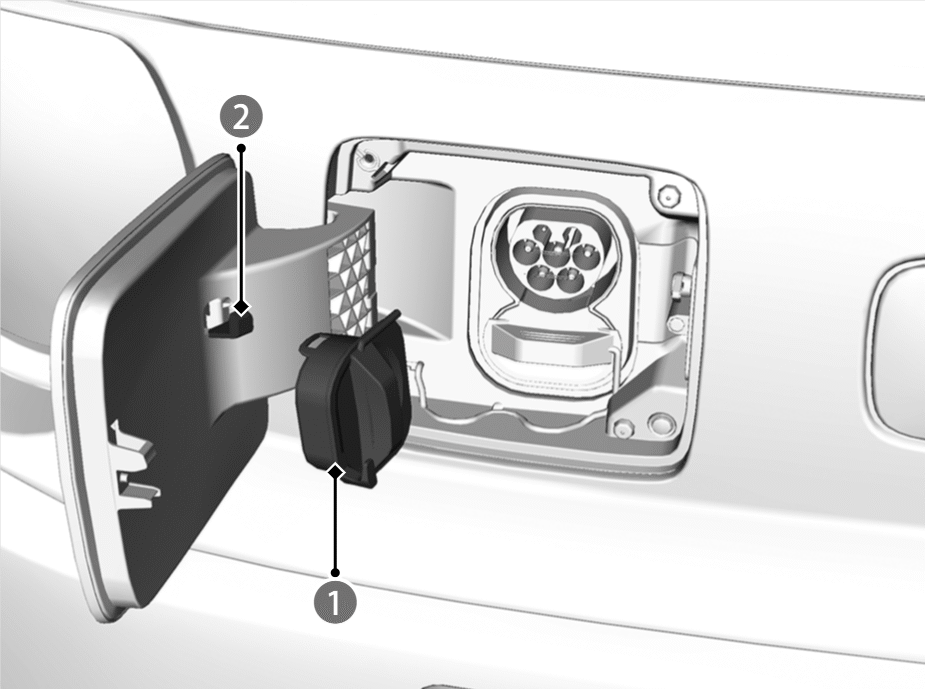
- Remove the upper cap ().
- Place upper cap on the hook ().
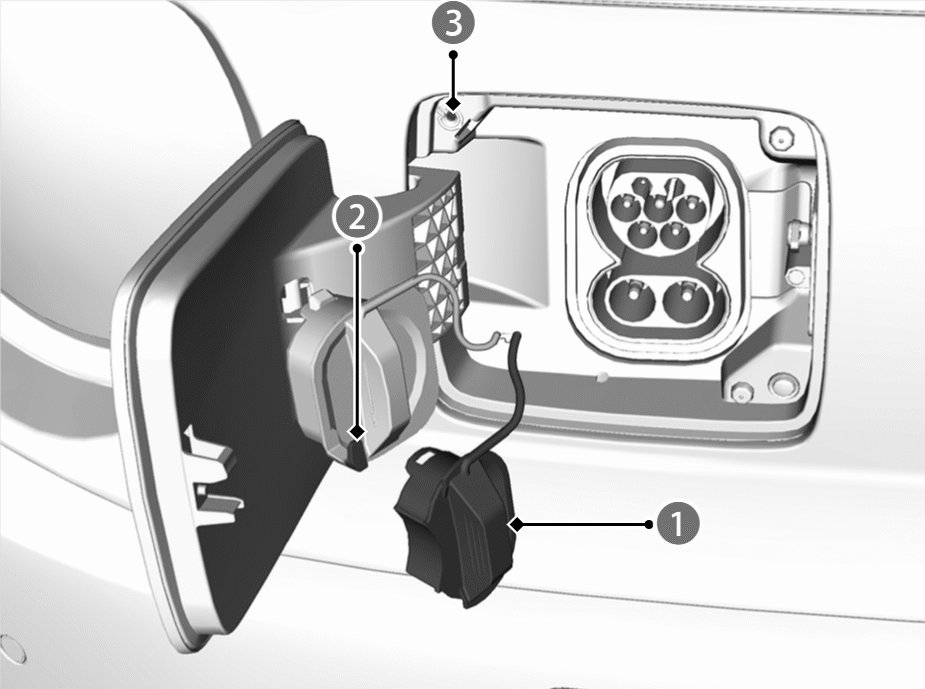
- Remove the lower cap ().
- Hook lower cap onto the hook of upper cap ().
- Align and insert the charging connector into the vehicle’s inlet securely.
- The charge indicator (white) () stops blinking, and changes to slow blinking (blue) on when charging starts.
- The charge indicator (white) (
When charging is completed
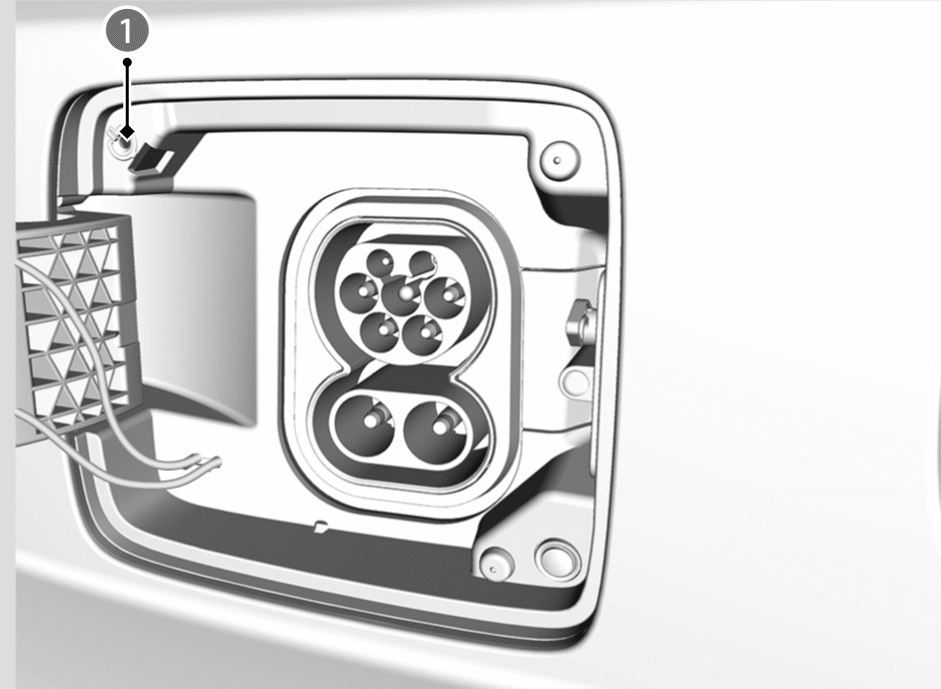
The charging connector to disengage it from the inlet. If the charging connector has a release button, press it to release the charging connector from the inlet.
- Make sure to close the caps before you close the charge lid.
The charge indicator (blue) () stops blinking once charging is completed. After about 15 seconds, the charge indicator goes off.
- The High Voltage battery may not charge depending on the charging station.
- Charging operations may vary depending on the type of DC charger equipment being used. To prevent damage to your vehicle or the DC charger equipment, be sure to follow the instructions and safety precautions provided with the DC charger equipment.
- Do not use any charging cables longer than 30 m (98.4 ft).
- The charge speed slows down towards the completion of the battery charging.
- Be sure to follow the instructions and safety precautions provided with the DC charger equipment.
- When you want to stop charging, follow the instructions for the use of the charger. Once the charging is stopped, you can release the charging connector.
- Values displayed on the charger, such as remaining charge time and High Voltage battery charge level, may differ from the actual values.
What to do when you cannot start charging
If charging does not start, check the following potential causes and take appropriate action:
- The DC charging connector is not properly connected.
- Connect the DC charging connector properly.
- The High Voltage battery is already close to a full charge.
- The DC charger is unable to charge.
- Make sure the DC charger is powered ON and confirm that it is functioning normally.
- The vehicle is malfunctioning.
- Check the gauge.
- The 12-volt battery voltage is low.
- Charge or replace the 12-volt battery.
- The temperature of the High Voltage battery is low.
- Charging is restricted to protect the High Voltage battery. Move the vehicle to a warmer location (e.g., by towing). Charging will become possible once the High Voltage battery temperature rises.
Charge Indicators on the Vehicle Side
The charge indicator () show the High Voltage battery charging status.
Blinks (white):
- The charger is ready to charge the battery.
Slow Blinks (blue):
- The battery is being charged.
Stays on (blue):
- Charging is complete.
Blinks (blue):
- The battery has been fully charged and systems such as the battery warming system have been activated.
- The climate control system is operating based on the settings in the smartphone app.
Blinks (red):
- There is a problem with the charging system.
Stays on (red):
- The charging connector not inserted correctly.
- When connecting the charging cable to the vehicle, insert the connector until it hits the back so that it does not tilt.
- Charging cannot be started after reconnecting the 12-volt battery.
- Start the power system once, then turn it off.
- Charging cannot be started because charging connectors are connected to both the AC charging inlet and the DC charging inlet.
- There is a malfunction in the vehicle.
Stays on (white):
- The charger’s stop button is pressed.
- Charging is stopped by the charger timer.